As my birthday and Christmas approached, I decided to place a few items on my list for the hoped for layout construction next summer (should our home finally sell). I decided to do some cost calculations to compare my options.
With the South Park, this was never an option. Precision Scale's flex track, if it is obtainable, is expensive. The only question for me was whether to use the aesthetically pleasing Code 70 rail or the more durable Code 83. I've read enough/heard enough frustration from other modelers about Code 70 in On3 (and Code 55 in HOn3) to be cautious about them. Regardless, I had no plans to run the heavy Rio Grande 2-8-2s which seemed to be the primary destroyers of small rail.
But, the Oahu Railway had very heavy rail. With 80-90lb rail, Code 100 is actually a little on the light side! I'll definitely use this on the double track main and probably beyond. I'll use Code 83 and maybe some Code 70 for the yards, docks, and sidings.
So, what is the best choice, San Juan Car Co's flex track or hand laying? By my calculations, SJCC track is $1.83 per foot while my preferred method of handlaying is $3.60-$3.80. Ouch. But, the Oahu Railway used 7' and longer ties...while the SJCC track has only 6' ties. Additionally, it has tie plates and only spikes on every third tie (if I'm reading their descriptions correctly). Therefore, in order to make an apples-to-apples comparison, I need to reduce the cost of spikes on my handlaying...and while that dropped the cost to around $2.50 per foot, it still wasn't too competitive with SJCC flex track when I consider the amount of track I intend to lay. But the clincher is that the 6' ties are shorter than anything that was used on the Oahu Railway. For the empire of my dreams, it will make a difference greater than $1000, but the hit will be spread out over more than a decade and I don't want to lower the prototypical accuracy of my track to purchase one or two additional brass locomotives.
My solution is to use Micro Engineering Code 100 rail on 7' Mt. Albert ties with either ME or Proto:87 oversize spikes for the mainline. I'll use SJCC flex track for staging and helixes(my top track plan has two). My secondary lines will use smaller rail both for appearance and cost. In some places, I'll substitute SG ties as the OR&L used them. I won't lay Code 70 on any sidings that will be likely to be visited by the 2-8-2s (sisters to the K-28s) or, someday, the big shays (sisters to WSL #8 & #9). Someday, I'll have at least a DSP&P diorama with Code 70 rail.
Previously, I loved the look of ME Micro spikes, but I didn't like their blunt ends. I'd rather pay 50% more and get the pointed end spikes from the Proto:87 store. I'll probably use the longer variety every few ties and fill in the short ones on every tie in between.
For detailing, I'll use Grandt Line fishplates with notches in the tops of the rail every 33' or 39' scale. I'm currently in the process of figuring out the rail length from photos. Logic says that they shouldn't be more than 29' or 33' (the OR&L's flatcars were 30' and 34').
For projects, I'm again working on the Montezuma in 1:20.3 scale for my son. With weight added, she run's like a champ and now has both a spiffy diamond stack and a sharp cab. I also re-wired an old, battery powered 1988 Bachmann Big Hauler for track power and we picked up a G scale "Percy & Troublesome Trucks" trainset for Christmas this year.
I hope to resume working on my OR&L #36 bash after Christmas as well as decal artwork for my passenger cars. After #36 is in service, I'll either build #35 or an 0-6-0...#9 or #12. Artwork for locomotive decals will be next on my list as well.
Sunday, December 18, 2011
Monday, September 5, 2011
Why John Allen didn't have kids
I've always loved, as have so many other model railroaders, the work of John Allen. But, I can now understand why so few modelers can even dream of such a masterpiece as his layout...because most have kids!
In the past week, Liam has outgrown his crib and received a big boy bed. He celebrated by using a chair as a ladder to unlock the door to our loft and get out a number of my locomotives (4 On3 plus some HO) twice last week...I've removed the door knob. He then learned to make his way to the basement and find the cabinet with most of my HO stuff...of course he found my favorite brass NKP Hudson! This evening, he found the place I hide my On3 models...and damaged my scratch built waycar. Do I need to mention that he also ripped the circuit board out of his OO scale Thomas the Tank Engine? I spend quite a bit of time rewiring it today. At least Madeline is limited to only going after what is left within 2 feet of the floor...
I've got the stock car conversion ready for the paint shop, along with my father's SUF stockcar which I've finished (brake rigging excluded). I made a point to vary the hardware a little bit on each car to represent the variations which existed in the C&S fleet (for example, the fancier as-built style middle corner braces on one of the cars).
Additionally, my C&S caboose is ready for its paint, my SUF stockcar is ready for touch-ups after some repairs/modifications, and my first scratchbuilt boxcar has received her new undercoats of weathering paint.
In the past week, Liam has outgrown his crib and received a big boy bed. He celebrated by using a chair as a ladder to unlock the door to our loft and get out a number of my locomotives (4 On3 plus some HO) twice last week...I've removed the door knob. He then learned to make his way to the basement and find the cabinet with most of my HO stuff...of course he found my favorite brass NKP Hudson! This evening, he found the place I hide my On3 models...and damaged my scratch built waycar. Do I need to mention that he also ripped the circuit board out of his OO scale Thomas the Tank Engine? I spend quite a bit of time rewiring it today. At least Madeline is limited to only going after what is left within 2 feet of the floor...

I've got the stock car conversion ready for the paint shop, along with my father's SUF stockcar which I've finished (brake rigging excluded). I made a point to vary the hardware a little bit on each car to represent the variations which existed in the C&S fleet (for example, the fancier as-built style middle corner braces on one of the cars).

Additionally, my C&S caboose is ready for its paint, my SUF stockcar is ready for touch-ups after some repairs/modifications, and my first scratchbuilt boxcar has received her new undercoats of weathering paint.

Monday, July 25, 2011
Trainfestival 2011 - Rock Island

Trainfestival 2011 was an enjoyable experience. The 765 was there, the two Chinese built QJ 2-10-2s, Viscose #6, the Grambling family's TWO tank engines, the magnificent Leviathan, the 1936 Nebraska Zephyr, and a variety of diesels (including a pre-war E-5 on the Zephyr).
For our drive up, we stopped briefly at the NKP 2-8-2 in Bloomington, IL.

She's essentially a USRA copy built by Lima in the 1920s. Ray B. has built some gorgeous models of these engines in HO.
We attempted to catch 765 on the return leg of her day long excursion, but she was moving at track speed for much of it and we didn't catch here until she pulled into Moline alongside us as we sat at a stop light!
The way it worked out (having my toddler along but not my wife), I didn't get many good photos...this is the closest thing to a side view of the Leviathan:

Leviathan did make at least one fine demonstration run...1000'+
There were 2 hour and day long excursions

The steam engines took turns pulling the 2 hour trips, with an Iowa Interstate RR GP on the rear end. This one had an Iowa Interstate 2-10-2.

It backed up to the Rock Island yard in Rock Island, IL and then ran across the bridge to the Rock Island, past the arsenal, and then across the 1890s bridge into Davenport. The passenger cars for this were from the Iowa Interstate RR and Mid America Car Leasing...heavy enough for a nice show on the 1% grade.

The older of the two QJs...1985! The younger one is from 1986! While the design is older than the 765 (a Russian version of an American design, iirc), you can tell that it is newer in the details. Additionally, the engineer sits on the wrong side and the controls are a little different. Neat engines.
In addition to the trains, there was a river boat for cruises on the Mississippi.

That's the Burlington's bridge closing after our boat for the 2:30 crew change.
Among the most intriguing "toys" at the festival were these 100-107 year old amusement park locomotives, Cagneys.

They've been restored and Wasatch is offering new ones.

The actual trains were located in a Burlington yard. The festival portion was at a beautiful city park next door.
There were a few nice diesels as well (it is rare for me to refer to a diesel as "nice")

This beautiful SW-7 wore different slogans on each of her sides...gorgeous...and was used for some real switching on one of the mornings.

The C&NW F-unit couldn't compete with her fellow Illinois Railway Museum sisters for cosmetic appeal.

I particularly enjoyed the contrast of the Burlington E-5 parked alongside the modern 4400 HP BNSF diesel (thank you BNSF for helping make this happen and for providing a display diesel!). The technology gap between the Leviathan and the NKP Berks is about the same as the gap between these diesels.
On the ride home, we stopped in Galesburg for the Burlington 4-6-4.

I remember seeing that engine from an Amtrak train when I was 5 years old...on my way to Como, Breckenridge, and Alpine Tunnel.
As much as I love steam...the class of the show was the 1936 Nebraska Zephyr

Not the 1940ish diesel, but the passenger cars!

What an unusual vestibule!

And the unique ceiling in the car...sort of the opposite of a clerestory!

The kitchen, which was being used to prepare diner for the night, was still authentic with charcoal stoves and a working ice box! The resemblance to the galley of the 1939 Pullman/NYC 6 BR-Buffet-Lounge car my father used to own was uncanny (but this was about 3x the size); surprisingly, the Zephyr wasn't anywhere near as ornate).

One of my co-workers made rode the Zephyr on its all-day excursion and still managed to pull off the 7+ hour drive home last night. I'd like to get up to IRM to ride it as well.

What a neat train!
Not dead
I'm not dead...I've just been severely hampered by selling our house and finding a new one...as well as working long hours at work and teaching two halflings to love trains.
I've done a few odds and ends in recent months, but my time has been too limited to photograph it or blog about it. The major project has been converting a Grandt Line C&S SUF stockcar I received for Christmas into a truss rod car.
http://www.grandtline.com/model_railroad/rolling_stock_and_locos.htm
There are a few hardware modifications needed for this, as well as a new roof and a new frame. The 1907-8 C&S freight cars were built with Betterndorf hardware (not just the trucks). The 1909-1910 cars were similar, but had steel underframes (SUF) rather than heavier wood frames with truss rods. The earlier C&S cars were different animals, despite many of these cars being indistinguishable to the untrained eye (such as the surviving C&S stockcar at the Colorado Railroad Museum).
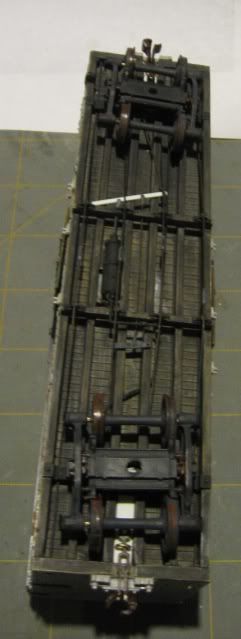
This shows the partially completed brake rigging with the new frame, truss rods, and trucks with modified brake beams (to be free rolling and allow the trucks to be removed without removing the brake beams from them).
The interior of the car and the underside of the new roof (probably wrong...as I suspect that they were actually internal Murphy Roofs rather than wood). Like the frame, it is all styrene.
The top view of the roof.
A view showing a few of the minor variations I've made from the instructions and modifications to the kit. The wood frame is made from noticeably heavier timbers than those used with a SUF car. A noticeable change is the modification to the stake hardware...for the bolster's truss rod.
Note: Trainfestival 2011 was this past weekend and it was located in the Quad Cities (Davenport, Moline, E. Moline, Rock Island, and BETTERNDORF). Betterndorf is where the hardware was made for the 1907-1910 C&S freight cars. Today, there is a casino on the site.
I've done a few odds and ends in recent months, but my time has been too limited to photograph it or blog about it. The major project has been converting a Grandt Line C&S SUF stockcar I received for Christmas into a truss rod car.
http://www.grandtline.com/model_railroad/rolling_stock_and_locos.htm
There are a few hardware modifications needed for this, as well as a new roof and a new frame. The 1907-8 C&S freight cars were built with Betterndorf hardware (not just the trucks). The 1909-1910 cars were similar, but had steel underframes (SUF) rather than heavier wood frames with truss rods. The earlier C&S cars were different animals, despite many of these cars being indistinguishable to the untrained eye (such as the surviving C&S stockcar at the Colorado Railroad Museum).

This shows the partially completed brake rigging with the new frame, truss rods, and trucks with modified brake beams (to be free rolling and allow the trucks to be removed without removing the brake beams from them).

The interior of the car and the underside of the new roof (probably wrong...as I suspect that they were actually internal Murphy Roofs rather than wood). Like the frame, it is all styrene.

The top view of the roof.

A view showing a few of the minor variations I've made from the instructions and modifications to the kit. The wood frame is made from noticeably heavier timbers than those used with a SUF car. A noticeable change is the modification to the stake hardware...for the bolster's truss rod.
Note: Trainfestival 2011 was this past weekend and it was located in the Quad Cities (Davenport, Moline, E. Moline, Rock Island, and BETTERNDORF). Betterndorf is where the hardware was made for the 1907-1910 C&S freight cars. Today, there is a casino on the site.
Saturday, May 7, 2011
Moving
We are currently in the process of selling our current home and purchasing a new one.
Instead of being limited to an 8'x 15' space with a low ceiling for a layout, the plan is for me to have between 900 and 1600 sq ft, dependent upon the home. My trackplan calls for about 1100 sq ft, including a crew lounge.
Due to the need to have the home ready for showings, all of my models and tools have been boxed up. Many of them are stored in my in-laws basement. God willing, we'll sell this home quite quickly and land in a new place early summer...reducing the duration of this unwanted hiatus. I hope to do a little bit with some models/kits and tools I have readily accessible, but there's no hope for me to get any resin casting done until we've sold our house or moved.
Tuesday, March 22, 2011
Odds & ends

Odds and ends are the order of the day so long as our latest edition remains unable to sleep on her own...and thence allows me more modeling time each evening.
My C&S caboose has been waiting for a few details and paint for some time. I added the grab irons to the interior and assembled the sinks quite recently amongst other little things. I can't really do anything else until I get an appropriate color for the interior (the top half of which was buff). I'll paint the bottom half an oxide red just as the recently found 1008 has. (I lacked some confidence in the paint used on C&S 1006 and 1009...but the 1008 was recently found in Los Angelos and had a more classic scheme...buff and red).

I've also been working a little bit on applying a surface to the roof on my first OR&L coach.

My Colorado Central lime car has finally received her truss rods...what an improvement! I need to add them to my stock car soon...

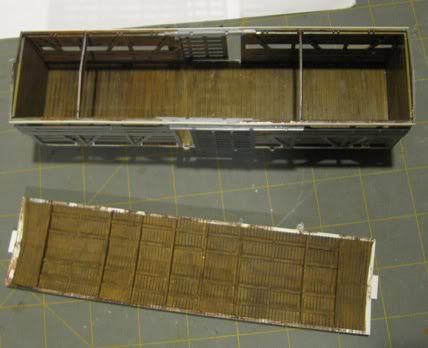
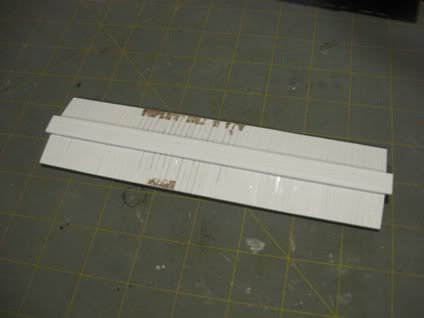
The most interesting project to me has been reworking my Waycar. The sides were bowed in (and were from initial assembly). It became on acceptable to me and so I cut out the old windows and added internal bracing. I also removed the fascia strips (sign boards) from the roof and attached them to the body. The new fixed window panes look quite a bit better imo. The removed parts are visible in that photo.

This photo shows the other new photos...assembled over a period of 15min this evening. You can also see the bracing I added to the car. Perhaps she'll also receive a new interior...but with a buff and green scheme rather than buff and oxide red... My next waycar will be straw yellow and then a long one in oxide red.
Saturday, March 19, 2011
A temporary scale back
Since child #2 was born in January, the hobby has been far more difficult to partake in. With one child, it was easier to work it into the day. But now, I'm lucky to have any energy left when I get to my hour of free time (if I'm lucky). Additionally, it isn't a good idea to use solvents (glue) in the presence of a 2 month old. So, I'm now focusing on finishing up my various projects (new windows for my DSP&P way car, finishing up the various cars which are greater 90% of the way complete). Earlier this week, I managed to finish my C&S coal car and she is now resting on the layout...getting to my LHS to purchase some flat finish was far more difficult than in the past. Today, I'm hoping to make nice strides on my way car's new windows, the C&S caboose's interior (which I can't finish until I get an appropriate depot buff paint), finish the CC gondola sides, and either touch up my OR&L coach's paint or work on trussrods/brake rigging of my DSP&P stock car. My family is at grandma's today...so I have some freedom.
I might work a little on the pattern work for the DSP&P coaches and the OR&L combines/baggage cars, but they won't make it into full scale production until after things calm down around the house (and the newest addition learns how to go to bed in the evening without being held constantly).
I might work a little on the pattern work for the DSP&P coaches and the OR&L combines/baggage cars, but they won't make it into full scale production until after things calm down around the house (and the newest addition learns how to go to bed in the evening without being held constantly).
Tuesday, February 8, 2011
Baggage doors and platform cars

Last night, I produced a standard Oahu Railway baggage door. This marks the first time since #2 was born that I've been able to produce a master. This standard door (the unpainted one) was common to all of the Oahu Railway's baggage cars and combines from what I've been able to tell (I haven't checked the arched roof combine). I haven't yet decided if she'll be a separate part from her frame or not (probably separate). To the right, for comparison, is an 1879 DSP&P baggage door.
In other news, my C&S coal car and CC platform car have received their red paint. The coal car has also been lettered. I haven't yet sealed the letter with a dull coat, so she's rather shiny right now. I like the finishes on both of these...and that color is my current favorite freight car red (I avoid painting all of my cars the same shade of red and I like to vary the level of weathering...uniform color shades and uniform heavy/light weathering are unrealistic).


I'll mare the lettering some before its finished.
And, the necessary comparison with the HOn3 version I built at age 17:

At age 17, I made two notable mistakes: the grab irons are flush with the sides preventing the Little Imaginary People from being able to use them and I painted the inside of the car. When I built the On3 version at age 26, I allowed clearance for the LIPs to wrap them hands around the grab irons. Similarly, at age 28, I've give the interior an unpainted wood finish.
Wednesday, January 26, 2011
The best way to begin scratch building?
I received two On3 C&S kits for Christmas. One of them was a C&S/RGS Reefer Hardware kit. While I build all of my own hardware, most modelers would consider starting with a hardware kit and plans to be "scratch building". Personally, I would consider it to be a craftsman kit since all that's missing is the material for the frame and siding (plus paint, decals, and glue). While I'm not planning to start it (or the other kit, a C&S stock car...both from Grandt Line) anytime soon, I opened it to verify that all the parts are present and share a photo here on my blog. If you've ever wanted to try scratch building, get this hardware kit and give it a shot. Since Grandt Line pulled their HOn3 models, there is no telling if this hardware kit will be available in a few years. Grandt Line's car kits are absolute gems, and this looks to be on par with their usual excellence.
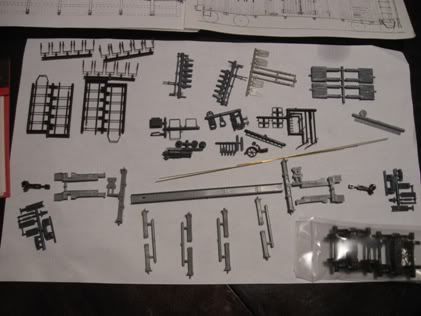
Here are the parts. At bottom is the steel underframe, trucks, and draft gear (plus Grandt Line's couplers which I regard as the best value for a coupler: function, appearance, and price). Above the SUF is the brake parts. Above them are the C&S reefer specific parts (the C&S door latches are on the sprue with the corner irons, not the ones with the hinges). To the left of these are the ladders and stirrups (which are far faster and easier than bending wires as on the stock car, gondola, and box car...the reefer only requires a few grabs to be bent)
Here are the plans and info on the SUF:
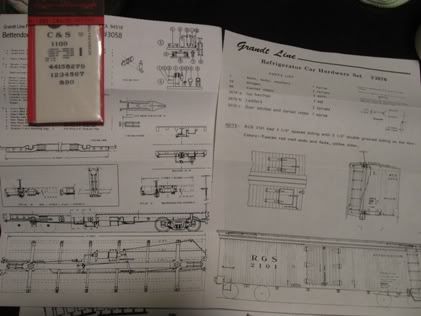
I picked up a set of CDS Dry Transfers for these cars a few years back. I'm still a couple sets of C&S stock car decals short...
------------------------------------------------------------------
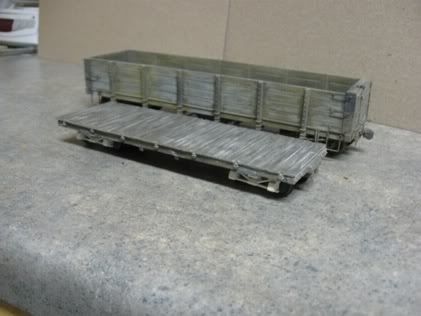
My first 23' flat car kit has received all but its red paint. The deck is quite dark on the top and more brown (like the underframe) underneath. This version I am building with out the intermediate sills (I'll build an example gon with the int sills).
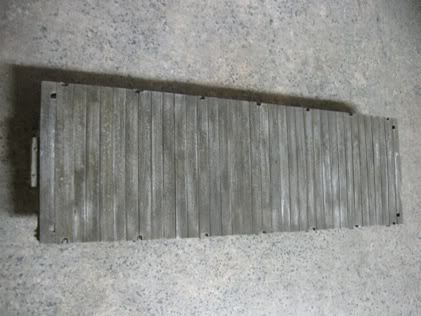
The deck
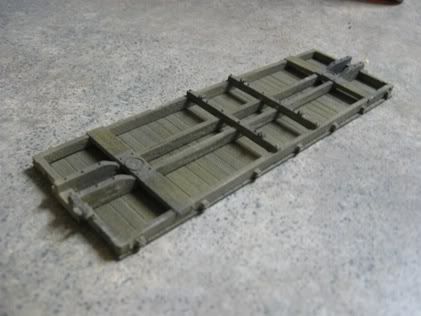
The underframe
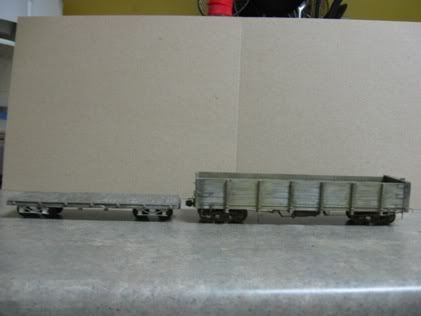
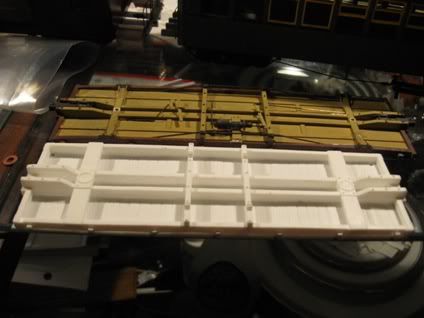
Comparisons against a Grandt Line 30' C&S coal car:

Here are the parts. At bottom is the steel underframe, trucks, and draft gear (plus Grandt Line's couplers which I regard as the best value for a coupler: function, appearance, and price). Above the SUF is the brake parts. Above them are the C&S reefer specific parts (the C&S door latches are on the sprue with the corner irons, not the ones with the hinges). To the left of these are the ladders and stirrups (which are far faster and easier than bending wires as on the stock car, gondola, and box car...the reefer only requires a few grabs to be bent)
Here are the plans and info on the SUF:

I picked up a set of CDS Dry Transfers for these cars a few years back. I'm still a couple sets of C&S stock car decals short...
------------------------------------------------------------------
My first 23' flat car kit has received all but its red paint. The deck is quite dark on the top and more brown (like the underframe) underneath. This version I am building with out the intermediate sills (I'll build an example gon with the int sills).

The deck

The underframe
Comparisons against a Grandt Line 30' C&S coal car:


Sunday, January 16, 2011
First Colorado Central 23' flat car castings
I decided it was time to try preparing a 2-part mold using my new rubber. Since the passenger car parts are large and hence could waste a lot of material, I decided to create the molds for my 23' Colorado Central flatcar. Additionally, it gives me a ready-to-sell product in the event that a need a revenue stream prior to having the passenger cars ready. The first castings were rejects, but the 2nd, 3rd, and 4th are good enough to use/sell. I've cleaned up two of these:
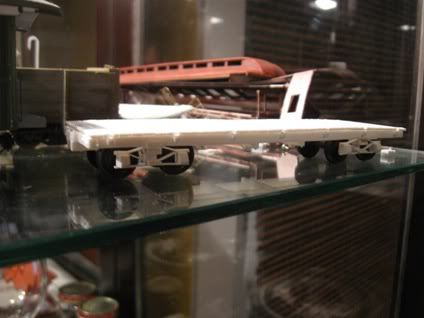
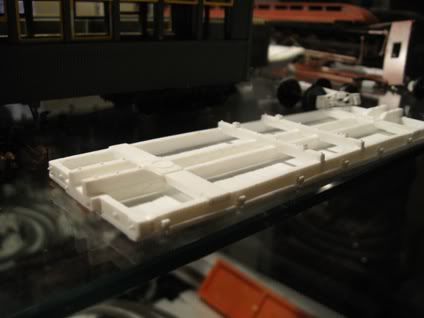
Here's a deck and frame sitting on a pair of incomplete trucks. Not shown are the two sets of levers that I'm including in the kits (one for power brakes, one for manual only).
Here's a view showing some of the details:
And the comparison shot against a DSP&P 26' flatcar.
The gondola sides are in the works, and the portion of the mold for the option intermediate sills was a bust. I'm in the process of building the first to kits to verify that scrubbing the parts is sufficient for removing the mold release residue...an issue I've had with some of the Oahu Railway coach parts which may not have been scrubbed. Once I'm happy with paint adhesion and assembly, I'll punch out a as many parts as the mold with give me, and then offer them for sale based off of the time and material each kit required to make (I'm hoping for $20-25 for the flat car, and $30-35 for the gondola version...both less trucks, couplers, decals, and probably brake wheels...all preference decisions which will vary from modeler to modeler).

Here's a deck and frame sitting on a pair of incomplete trucks. Not shown are the two sets of levers that I'm including in the kits (one for power brakes, one for manual only).
Here's a view showing some of the details:

And the comparison shot against a DSP&P 26' flatcar.

The gondola sides are in the works, and the portion of the mold for the option intermediate sills was a bust. I'm in the process of building the first to kits to verify that scrubbing the parts is sufficient for removing the mold release residue...an issue I've had with some of the Oahu Railway coach parts which may not have been scrubbed. Once I'm happy with paint adhesion and assembly, I'll punch out a as many parts as the mold with give me, and then offer them for sale based off of the time and material each kit required to make (I'm hoping for $20-25 for the flat car, and $30-35 for the gondola version...both less trucks, couplers, decals, and probably brake wheels...all preference decisions which will vary from modeler to modeler).
Wednesday, January 12, 2011
Cleaning up windows
The majority of the time needed to create passenger car sides is spent on the windows. I'm cleaning up the 60 windows I cast to create the car sides. I need at least 28 double pane windows for the combine and baggage cars. I need 17 single pane windows for the chair cars. I'll take the best windows and use them in the masters, and then the rejects will likely go to a friend in Chicago who has previously generously helped other friends/South Park modelers.
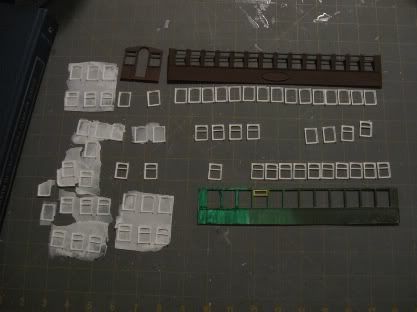
Above the 17 windows needed for the chair car, I have a Barney & Smith coach side. The B&S coaches was within 2" of the chair cars in length, and so they are give a good feel for how the windows will be spaced. Similarly, I've put the 11 arched windows needed for one side of the combine (with a space left for the baggage door) next to an Oahu Railway coach side, which minus the corner moldings is 1'4" longer than the combine. In the middle are extra windows plus the four needed for the baggage car side. I'll clean up the remainder of the photos prior to assembling the sides.
EDIT: I forgot to mention that, as of today, we have a 1 week old daughter. Despite being off work for this splendid event, I haven't had any additional hobby time. I attempted to take our 2 year old son to the local Wonder of the World, an 80,000sq ft model railroad, but learned after we got there that they are closed Weds from January thru March. We made up for it by stopping by one of the dozen local railroad yards...the only one with passenger cars...and let him watch a little switching (he loves that sort of thing).
Saturday, January 1, 2011
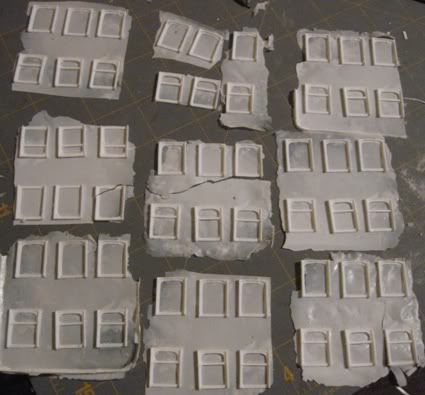
Arched windows galor!
I now have 54 windows sitting on my self healing mat. They are of two designs: single and double pane. The single pane variety are for the South Park's 1879 chair cars. They require 15 per side plus 2 per end (17 minimum to produce the necessary kit parts). Combine #6 requires the double pane variety, 11 per side plus 2 per end, while the 1879 baggage cars require 4 per side. I'm looking forward to building the car sides quite soon. I'll then need to create a 40'4" car version of the roof and continue with the odds and ends (end beams, roof vents, etc).
These are 2" scale wider than the original version.
--------------------------------------------------------
On a related note, my Oahu Railway coach is coming together. Here's a photo of here:
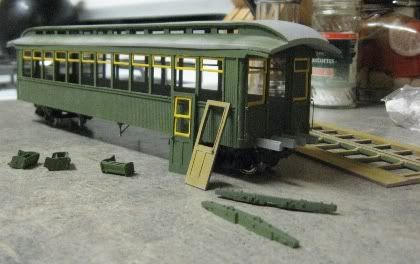
The wavy roof is an optical illusion created by a slight bow in the not-yet-attached and missing-the-interior-wall side. When pressed into place, it is beautifully straight.
I really love the Oahu Railway, DSP&P and Colorado Central. That were such interesting roads.
Subscribe to:
Posts (Atom)
