I've been studying many photos of Oahu Railway coaches, surviving and deceased, for clues as to sort out the truss-rod and bolster details.
So far, I've learned a few things.
The shop built clerestory coaches (such as my kit) had the customary two truss-rods which connected to truss-rod irons at or just before the bolsters. The body bolsters were the common type, metal plates, presumably attached to the side sill (I have yet to find a photo showing the bolster-side sill arrangement for these).
The arched roof cars, as well as shop-built clerestory combine #36, and the observation cars Pearl (Carter built) and #64 had wood body-bolsters with truss-rod washers. The body truss-rods ran from end sill to end sill with square washers visible. #64 has more than two truss-rods...probably 4...which is peculiar for a car that never need to haul much weight nor have other cars behind it.
I haven't yet come to any conclusions about the Carter built coaches (3, 11, & 12) and combines (38 & 39).
I'm going to ponder these questions, perhaps ask around, and try to make sense of it. My gut says that the truss-rods connected to the end sills were a sufficiently stronger/better arrangement that they could get away with wood bolsters.
In the past week my preferred local hobby shop as moved out from under its former toy store roof (Johnny's) and become a stand alone store: Tim's Trains & Hobbies. Today, my friend Pat and I visited. I picked up a number of sizes of styrene needed for building Oahu Railway freight cars. In general, Oahu Railway freight cars used sills of twice the size of South Park cars (for which my "lumber yard" was stocked). Afterwards, we stopped by an open house at the local RR Museum (a collection of private cars in poor repair) and toured ubiquitous Cascade as well as a 10-1-2. For those not familiar with Pullman cars, Cascades were sleeping cars built by Pullman starting in 1938 with 10 Roomettes (single rooms) and 5 double rooms. A 10-1-2 was a heavyweight sleeper (1920-1935).
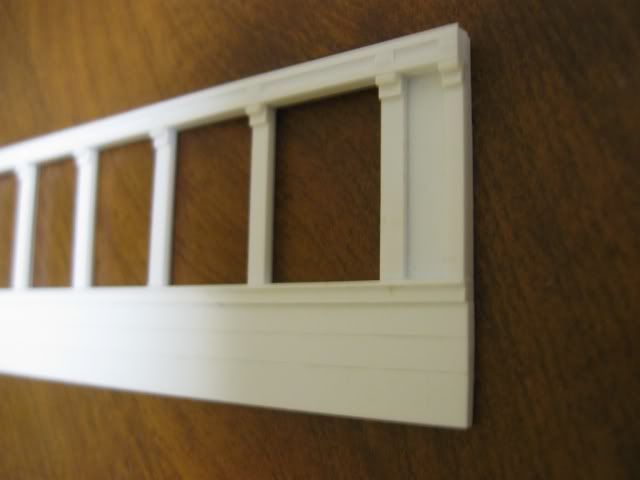
Saturday, May 8, 2010
Thursday, May 6, 2010
Oahu Framing
The shop-built Oahu Railway coaches didn't have ceilings (sheathing under the framing). Accordingly, I consider it important to have a prototypical frame under the cars which is consistent with that under the surviving coaches.

The red mark is the result of my toddler and his red crayon...I'll remove it before the mold is made. Every visible surface on the frame has been textured with wood grain. I'm in the process of researching the hardware that goes on it (and what can be cast in-situ). I've identified two bolster types, but not been able to clearly determine if one style was specific to Carter built cars or shop built cars. I do think that the Carter built cars and #64 had ceilings (#64 definitely did).
I've temporarily cleared my workspace and filled it with grad school stuff in my attempt to gain freedom for hell (grad school).
Wednesday, April 28, 2010
The cons of contests
It is hard to believe that it has been 2.5 weeks since my last post. I'd planned to do so after the NMRA meeting, but that was delayed.
There was an incident with one of my entries (1st place, scratchbuilt). Someone managed to send it to the floor...and with its 1/2lb+ worth of weight, it landed hard. I'd requested a photo from one of the guys whom was taking such photos, but he hasn't returned my email (which is always annoying for someone like me whom strongly prefers email to phones). I was going to post once he sent me his photo...or at least gave me a response. (Edit: he was out of town, and isn't quite as addicted to email as I am)
Here's what the car looks like:

Isn't that pretty? It actually won't take me too long. I only used the PSC end beams because I was short on time and I hastily created the brass end rails. All were supposed to be temporary...and now they've been crushed. The body generally broke cleanly. Had the frame been attached to the body, I have no clue as to how she would have done (probably worse). Most of the steps were knocked off. Fortunately, the scratch built styrene roof was unscathed. Thank God. I'm planning a new display track which will anchor the cars so that such accidents can't happen.
In other news, I built a set of box step masters which were based on the 1879 South Park passenger car box steps. I did that on Thursday or so of the NMRA week. The mold was completed on Saturday morning and the first set of castings came out fine.

Here are the masters, prior to adding the hardware.

Here's what they look like on the baggage car. No, they aren't crooked...it's just the photo. It is actually a terrible photo of that car...a quick snapshot. The roof had smearing issues as I hastily painted it at 1am before the NMRA contest. The stuff I used, evidently, smears horribly even after it is dry...thank you Testors for reformulating Floquil!
The car is sitting on my new test track. I decided that it would be a good idea to evaluate this:


That's the overhang on a 36"R curve. Much better than the 27" and 30" curves of my existing, temporary layout. I'm looking to go with 42" as a minimum mainline radius for my future OR&L layout and either 42" or 36" min. main. rad. for my South Park line. My test board has the roadbed in place for 42"R and a line marked for 48"R. My layout, of course, handles 27"R and 30"R testing.
I'm probably going to see about modifying McHenry's HO talgo couplers into Link & Pin couplers for my passenger cars. They are about the same size and close in shape to the South Park's L&Ps. For my Oahu Railway cars, I'll be using Knuckle couplers so it won't be an issue (possibly PSC's brass couplers or some other non-Kadee couplers).
I managed to lay that track in a short time before dinner. I used a hot glue gun so that I didn't have to wait before spiking. Obviously, it isn't a good approach for a layout...but it worked well enough for track that won't be carrying trains.
I think I'm going to go ahead and build my master frame for the Oahu Railway coaches...I don't know when the photos will arrive, but I know the dimensions and spacing...so I can build it accurately.
Saturday, April 10, 2010
Oahu Coach roof casting
I've been a month or more without a home for my casting. My previous location was the kitchen table...not a long term home nor a safe one. I can't use my desk, as I must pass through Liam's room to get there...and he is usually asleep when I want to do casting.
So, I cleaned up my basement workspace and it is now the home of my resin work.

I've generally found that the ultimate table protector is garbage bags. Neither silicone rubber nor polyurethane will stick to it...and it is a material we always have in the house.
Since I now have a home for it, I managed to prepare some new molds and make a few test castings.

This is the second casting from the interior wall mold. I like it. I may add coat hooks above each seat, per the prototype in the early days, using brass wire.

And this is an out of focus view of the first OR&L roof casting. It is a beauty. There is one air bubble along one of the ends which I'll probably fill for durability, as well as a portion of the sheathing which is a little thin and might get reinforced. The other defect is the swayback. While a swayback is a coveted feature amongst many model railroaders, I am not in that camp. I ought to be able to fix it with a little heat. The detail of the master has been nicely captured in this resin casting. In order to get one of these cars ready by next weekend, I may just fabricate a frame in styrene for the first car...and do the master & mold later.
Currently, a DSP&P 34' passenger car roof is curing in my other roof mold.
Monday, March 29, 2010
Interior detail
I don't know when to stop. After waiting over a week for a chance to visit the LHS for more 2"x2" (actually 0.040"x0.040") styrene to properly build this part, I can't decide where to stop with the details. I was going to skip the paneling above the windows since it was a) not normally visible and b) removed from the cars in can service and c) varied slightly between the cars. But, I have now gone ahead and added the most common variation...with a couple touches left to consider adding.
 I like it. I've left the footboard off. It'll be a detail to be added separately, so that if someone screws up with assembly...it is okay (it also gives me slightly looser tolerances when casting).
I'm still waiting on some additional info for the frame. I'll probably build a prototype frame for car #1 so that I can take a completed car to the local NMRA meet (April 18th). Haven't yet decided if she'll be a coach or a combine. The contest category is passenger cars. I'm planning to finish DSP&P #40 and #051 as well for that day (I need to order alphabet sheets so I can letter them. The Oahu cars require a custom font...the Mrs. will be helping me with that). #40 needs the underframe taken care of and the roof surfaced/painted. #051 needs its lights replaced, an interior built, and brake gear. Both need end platforms/steps. I'm going to use a combination of an 1886 WABCo catalog I found online in conjunction with a 1900 WABCo catalog I've borrowed from my dad and the 1879 Car Builder's Dictionary to produce more accurate parts than I believe to be commercially offered (for now).
Sometime after that, I'll submit my entries for my Car Builders Achievement Award and I'll be presenting a mini-clinic at the May NMRA meet on scratch building detail parts. I have to put aside all 1:1 research of the Oahu Railway between now and then so that I don't get distracted.
Sunday, March 7, 2010
What is the correct color?
Few debates have less basis in fact and are more edifying than those which revolve around correct colors. It is sometimes even worse if color photographs do exist!
Here are a few basics which I know and which affect my opinions:
-There is no such thing as a uniform, standard railroad color.
Why? First, even if they start off identical in hue, cars that spend much of their time in the shade won't be bleached as badly as cars out in the sun (there are other weather factors as well).
-No railroad shop had the facilities and staff to repaint every single car the exact same day from the same batch of paint. Most cars were only repainted as needed. Many South Park cars carried their original numbers and lettering into the late 1880s after the renumbering in mid-1885. This was particularly important when we factor in that paint's weren't mixed by computers and hence would vary a bit from batch to batch...year to year.
-The vast majority of railroad photographs from the steam era (the period of my interest) were in black and white...so even if the colors are known, the matching a shade can be extremely tough...even if there weren't variations. Since different processes where sensitive to different types of light...mint green for example...would look almost the same as white or light yellow in many B&W photos (the great South Park Waycar and Tiffany debates...white/white for me).
The only mentioning I can recall of Oahu Railway colors is "Pullman Green" in Vol 1 of the Hawaiian Railroad WWII Photo Album. The cars...both preserved (I trust #64's colors the most) and white I can gleam from the B&W photos look much lighter than either Scalecoat and Floquil's Pullman Green. Granted, there are variations in the colors as represented on compute displays (mine has been calibrated to ameliorate this), but I like what I've come up with.
Here's my test:

The left is $0.50 acrylic green. The right is Floquil's Pullman Green. The center is Floquil's light green. These parts were not fully cleaned up before painting...so it didn't adhere too well...by well enough for this test. Light green with reefer yellow windows works for me. In some photos, the yellow looks to orange while in others doesn't appear to have enough orange. I've been careful to examine the colors under both high and low light conditions...as that matters too. A perfect color match from a prototype will yield way too dark of a model...prototypes are seen under much, much brighter lighting than is practical for a model railroad.
-----------------------------------------------
Here are some of my castings:

I think they are pretty. I have a window insert in one of the car ends. The sides a spot on thickness...0.060" at the sheathing. The tolerance for acceptable window castings is under 0.040" of total thickness. That way they'll fit into the grooves to slide up and down.
This evening I'm going to either start (or completely assemble) the interior master. It'll probably be a two sided part. I've designed it to allow the windows to be removable after assembly (when the roof is off). A groove will exist in between the interior wall and the fascia (letter board) to allow for the roof to lock into place/prevent light from leaking. I will not produce a roof mold until after the master has been test fitted to a complete production car body. The underframe is awaiting the arrival of digital photos to supplement framing measurements on OR&L #1. At that point, hardware construction will begin (brake rigging and such).
Since I don't know when to expect the photos from the very generous person whom has gone out of their way to help (thank you very much!), I'll probably make a trip to my LHS in the next couple of days to secure parts for construction of the side masters on the South Park baggage car kit. (an easy assembly...I've previously worked the details out on my #40).
I need to prepare the decals for the Oahu Railway cars. Mein Frau ist ein graphic designer. Her day job is designing signs on vehicles.
Wednesday, March 3, 2010
Production has begun!
Today, production casting was initiated on the Oahu Railway coaches. I have yet to develop the interior and floor masters, as well as the roof mold, but I want good side castings first. After a few technical difficulties over the last few days, today I reached production quality. I am comfortable putting my name on parts this good...nearly air bubble free, smooth surfaces, and very thin flash. I'll upload some photos soon...
In the process, I've learned a few tips to integrate into the next kits. I'm really looking forward to the Barney & Smith cars. Thanks to Mr. Brian Norden, I now know where to go for SP drawings of the trucks...which means that I'll hopefully be able to build them. Today, I tracked down a means of having "BARNEY & SMITH MF'G CO. DAYTON. O." on the parts. The book, The Birth of California Narrow Gauge, has a great photo of an 1876 B&S pedestal...it is a clone of the "V&T" market pedestals (copies of the B&S parts) currently under C&C #2 (thanks to Mr. Andrew Brandon for showing a really clear photo of one).
In the process, I've learned a few tips to integrate into the next kits. I'm really looking forward to the Barney & Smith cars. Thanks to Mr. Brian Norden, I now know where to go for SP drawings of the trucks...which means that I'll hopefully be able to build them. Today, I tracked down a means of having "BARNEY & SMITH MF'G CO. DAYTON. O." on the parts. The book, The Birth of California Narrow Gauge, has a great photo of an 1876 B&S pedestal...it is a clone of the "V&T" market pedestals (copies of the B&S parts) currently under C&C #2 (thanks to Mr. Andrew Brandon for showing a really clear photo of one).
Subscribe to:
Comments (Atom)

